


Pilots who like to get a jump on things, who like to optimize, who seek precision, maybe even perfection, usually make good instrument pilots because single-pilot IFR in a small aircraft is like riding a mountain bike while simultaneously playing chess. That's why the really good instrument pilots find a way to reconcile their perfect, ideal vision of precise flying with the harsh realities of the turbulence, weather, icing, and equipment failures. While striving to fly precisely and smoothly, instrument pilots need to remember that VOR courses are rough, DME units quit working, GPS receivers give RAIM failures, and ATC often finds the worst possible moment to give you an amended clearance. That's when you find yourself in the hole. Now it's time to cut to the chase, take a bite of your Powdermilk Biscuit™ and do what needs to be done.
To get yourself out of the hole, there are really just four existential questions that you need to be able to answer.
Where am I?
Where am I going?
How will I get there?
Where am I going after that?
In a perfect world, we complete the approach briefing while more than 25 miles away from our destination airport. We already have the ATIS recorded, the altimeter(s) set, the radio frequencies set, the navigational aids' Morse code identifiers verified, and a RAIM prediction completed. But sometimes the real world doesn't cooperate - your plane ices up, you need to divert around some weather, or ATC vectors you all over hell before dumping you on the approach course, too close and too high. When you find yourself behind and getting further and further behind, you need to be able to implement the crisis approach briefing and get yourself out of the hole.
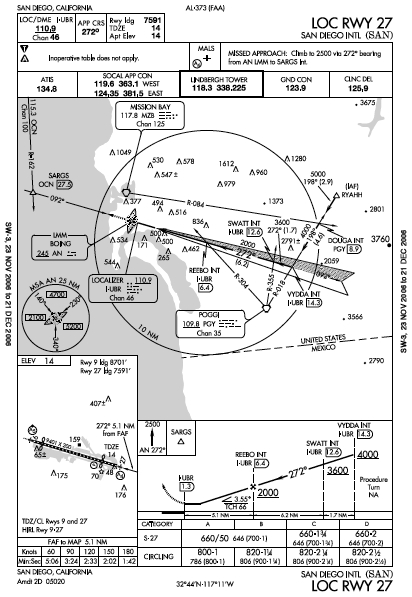
The first step is to quickly digest and configure the minimum navigation setup that will get you to the airport. I find that once a pilot has completed this initial set-up, most are able to relax and complete a more thorough briefing as they get vectored to the approach course. So forget about having three different ways to verify the final approach fix, at least initially. Later you will carve out some time to do a complete briefing at bit at a time (including all three ways to identify the final approach fix). To illustrate the crisis briefing, consider the localizer approach for San Diego's Lindbergh Field.
I flew this approach several times as a freight dog and SoCal approach often wanted to clear me for a visual approach. The first time this happened, I went along with the notion of a visual approach because it would save me time. Then I realized that I was heading into the setting sun and couldn't call the field in sight. The lesson I learned was to make a point of being prepared to fly an instrument approach, even if my destination airport was reporting VFR conditions.
If you checked in with ATC without reporting that you had the current weather for San Diego, the controller should have given you the altimeter setting and asked you to report when you had the current weather. If you lied and told ATC you had the current weather when you didn't, now is the time to tune in the ATIS and at the very least note the wind direction and speed, the ceiling and visibility and the altimeter setting. Not having the current weather at the destination airport and not having the correct approach briefed prior to being handed off to the last approach controller are the hallmarks of a poorly-prepared pilot. Regardless of your concept of your own flying, today you are poorly prepared. You'll have to deal with it and move on if you want to get out of the hole.
San Diego is a big city airport and SoCal is going to give you vectors to the localizer, so this will make your life easier, right? Not necessarily. Frequent heading changes and altitude assignments can be a distraction, actually increasing your workload. So start answering the four existential questions.
Where are you? Somewhere to the east of Lindbergh Field.
Where are you going? To Lindbergh Field, of course!
How will you get there? You're getting vectors to the localizer approach.
Where are you going next? You going to descend on the localizer approach and ultimately see the runway and land or fly the missed approach.
Look at the title of the approach and read it out loud to make sure you have the correct chart. Fly IFR long enough and all approach charts start to look the same. It may sound pedantic to read the name of the approach out loud, but I've seen pilots (including yours truly) do some astoundingly dumb things when under pressure.
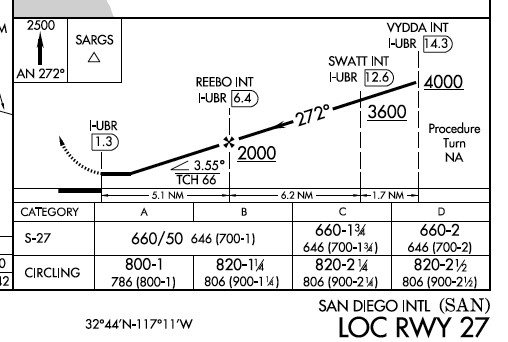
Next, glance at the briefing strip. Virtually all NACO approach charts have a briefing strip format similar to Jepp charts. The briefing strip contains the main items that will get you to the runway, namely 1) the localizer and 2) the DME. The briefing strip also tells you the approach course, the touchdown zone elevation, the missed approach procedure, and the important communication frequencies.

Many pilots I fly with insist on struggling with the chart and setting up the frequencies by hand, which is fine if you have an autopilot or another pilot sitting next to you. And if you aren't flying a plane equipped with a later model GPS receiver, this is what you have to do. If you are flying an aircraft with a Garmin 430/530 or a G1000, do yourself a favor - Swallow you pride, press the PROC button and just load the damn approach! Many pilots do this as an afterthought and in the process they create a lot of work for themselves.
In the case of the localizer approach into Lindbergh, loading the approach in a Garmin 430/530 or G1000 will automatically put the localizer in the back-up frequency. All you have to do is swap the localizer frequency in the active slot, identify it (this should be done automatically by a Garmin 530 or G1000), and then set course and source: Set the OBS or HSI (for non-G1000 systems) to the approach course and verify that the navigation source is the localizer and not the GPS. Tune the DME to the same frequency, take a deep breath, relax, and go back to concentrating on flying the vectors and altitudes that ATC is giving you knowing that a big chunk of the approach set-up work is complete.
What about activating the approach in the Garmin GPS, you ask? Simply loading the approach will display the step-down fixes and where you are in relation to those fixes on the moving map, but you'll have to do some fancy knob-twisting and button-pushing to activate the correct leg of the approach. If you think you're back on top of the approach, go ahead.
 To get you on an approach course intercept, ATC should give you your position relative to a published fix on the approach, a heading to fly, an altitude to maintain until established, and your approach clearance. Before this happens, you should have plenty of time to digest the rest of the approach.
Once you are established on the localizer, keep the localizer needle centered and keep track of your distance from the missed approach point. This is a good time to let your focus shift to the profile view, which lists the fixes and the altitudes to fly as well as the basic missed approach instructions. When you are a about 5 miles from the final approach fix, then press the PROC button and select Activate Vectors to Final if you haven't already activate the approach.
And what about that missed approach procedure, you ask? Note that the missed approach instructions tell you to fly the 272 degree bearing from the AN LMM to a VOR cross radial, which defines SARGS. Funny thing, the chart doesn't say that ADF is required nor does it say you can fly the localizer backcourse to SARGS. It's quite likely the backcourse is unusable, since there is an ILS approach to the opposite runway that uses the same frequency and SARGS is the final approach fix for the ILS. What gives? I wish I knew, but I don't. I've seen other approaches like this and when someone asked the FAA instrument approach procedures folks for an answer, the answer was often that the chart was updated to say "ADF required." If you are not flying with an IFR-certified GPS, you're going to have to work this out. Hopefully you have ADF in your aircraft or perhaps an FMS since you're flying into a busy Class B airport.
If you do need to fly the missed approach with a Garmin 430/530 or G1000 equipped plane, you'll have two important button pushes to make after you have passed the missed approach point and after you have configured the plane to climb (remember to climb and fly the plane first): Press the OBS button to re-enable waypoint sequencing and set the navigation source to the GPS. In non-G1000 aircraft, you'll also have to set the desired track on the OBS or HSI.
Hopefully you will not have to fly the missed approach and you will find yourself safely on the ground, where you will promise yourself that next time you'll be better prepared and that you won't fall into the hole.


