Your approach clearance will contain the following item which you can remember with the acronym P-TAC:
1) Your Position (distance) relative to a fix or waypoint on the approach
2) Heading to Turn to or maintain
2) Altitude to maintain until established
3) Clearance for the approach.
Once you are established, comply with all crossing restrictions listed on the approach chart and you shouldn't run into anything. If there are intermediate approach fixes, you must be prepared to identify those fixes so you can maintain the appropriate altitude.
If there are several intermediate approach course fixes (IF) before the final approach fix (FAF), you're probably executing an instrument approach procedure to an airport surrounded by mountainous terrain or close to another airport that also has instrument approaches.
For non-RNAV approaches, a controller can vector you to most any point on the intermediate approach course, then give you the approach clearance. The controller's handbook says they are supposed to vector you no closer than 3 NM from the FAF with an intercept angle not to exceed 30˚ and that's usually what they do - but not always.
For RNAV approaches, controllers are restricted from vectoring you to a point inside an intermediate fix (IF). They should get you in a position where they can clear you direct to an IF with an intercept angle of 90˚ or less. And since you are RNAV (or GPS) equipped, you then resume your own navigation to the approach course and intercept it on your own.
Continuing on the previous discussion about Garmin's implementation of Vectors-to-Final for instrument approaches, I stumbled onto a way to get the Garmin 430/530, 430W/530W, and G1000 to display all intermediate approach fixes when being vectored to the final approach fix.
For the G1000, consider the Oakland ILS or LOC DME 27R:
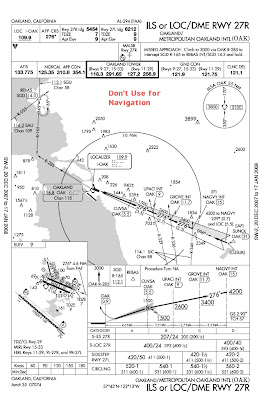
I've seen many pilots hear a controller say "Fly heading 180, vectors for the ILS 27R," load the approach, see the "Vectors to Final" approach option, and then, almost unconsciously, select that option. For this approach, this is what you get when you select Vectors to Final. When the controller says "Barnburner 123, three miles from GROVE, cross GROVE at or above three thousand four hundred, cleared ILS 27R" you're now left trying to figure out where GROVE and UPACI are located.

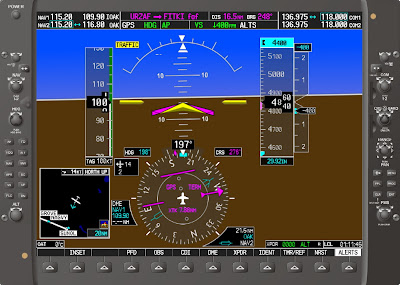
Wouldn't you rather see this?

Here's how: Load the approach with the initial approach fix instead of vectors to final. Press the FPL button, press the small FMS knob to enter cursor mode, scroll with the large FMS knob to the final approach (FITKI in this case), press the MENU button, Activate Leg will be highlighted by default, press ENT twice, and you're good to go. This same sequence will also work with the Garmin 430W and 530W. The older Garmin 430 and 530 require a different sequence sequence, covered below.

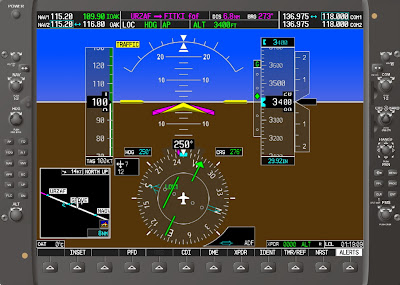
If you're wondering how this setup works with the Garmin autopilot, the answer is "very nicely." Just set the heading bug to your assigned heading, activate the autopilot in HDG mode, and press the NAV button. The autopilot will stay on the assigned heading until the course comes alive, then it will turn and intercept.
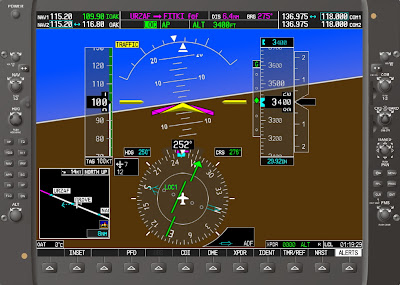
As you approach the localizer course, the nav source will automatically switch from GPS to LOC.
To get the intermediate fixes to display the Garmin 530 or 430, the sequence is a bit different. For this example, let's consider the Salt Lake City ILS RWY 16R, which has three intermediate fixes outside the FAF.
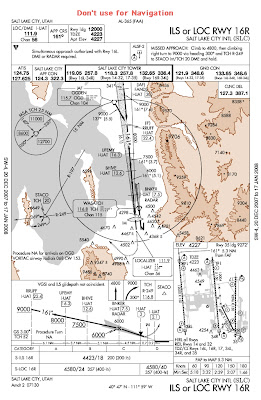
Load the approach with OGD or FANDS as the transition: It doesn't really matter which one you choose.

Activate the approach and you'll be dumped into the flight plan view. Press the small knob to enter cursor mode, scroll with the big knob and highlight BNKER (the FAF), then press MENU.

The Activate Leg option is highlighted by default, so press ENT twice.

This view gives you pretty much what you need, but if you want to see the magenta line extended out farther, there are a couple more steps.

First, make sure your OBS or HSI is set to the localizer front course.

Next, press the OBS button and you'll see the magenta line extended outward. Small problem, the intermediate fixes have disappeared.

Press the OBS button again and like magician David Copperfield, you've reversed the disappearing act and the IFs are shown again.

Wouldn't it be nice if this was done automatically for you? WTF?


