


If you are flying an approach you've never seen before, reading the approach chart is very much like what musicians call sight reading: Translating squiggles on a page into music you've never heard before, in real time, often in concert with other musicians. To maintain sight reading skills, whether from a piece of music or an approach chart, you have to practice. If you don't practice flying unfamiliar approaches from time to time, your sight reading skills will deteriorate. Playing wrong notes during a musical performance can be embarrassing, but the results of a mistake on an instrument approach chart can be far, far worse.
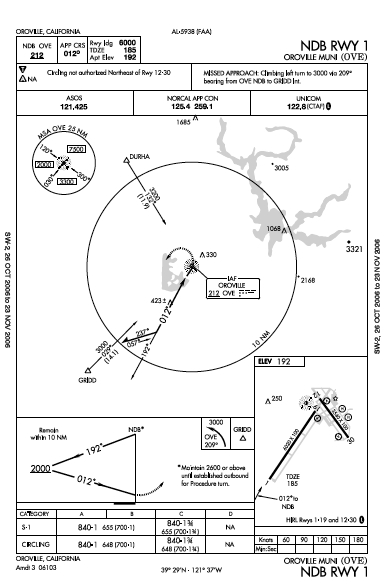 The Oroville NDB RWY 1 approach has a very simple layout and the sad fact is that there seem to be fewer and fewer approaches like it. The disadvantages of this type of approach are that accurately flying an ADF indicator is admittedly a bit harder than a VOR and definitely harder than flying to a GPS waypoint. The approach requires a procedure turn and the minimum descent altitude is not terribly low. This sort of approach works well in relatively flat, obstruction-free areas, but doesn't work as well in mountainous areas. And of course there all the vagaries to which NDB transmissions are heir. The advantages of this approach are that it is clean, easy to read, and flying to the missed approach point involves just one navigational aid. Ah, the good old days ...
At first blush, the Tracy VOR or GPS A approach seems simple, which is why I like to assign it to instrument rating candidates and pilots during a proficiency check. I've witnessed pilots fly this approach, oh, at least 80 times in aircraft with equipment of varying sophistication. Even though I know this approach pretty well, I'd prefer flying it in instrument conditions as either a GPS approach or in an aircraft with DME. Here's why.

The intermediate and final approach segments are based on the Manteca 220˚radial and if you have DME, identifying the step-down fix, final approach fix, and missed approach point is easy. To navigate to the MAP, you only need to do a minimum of three tasks: Set a VOR receiver to the Manteca VOR, set the DME to Manteca, and set the correct radial on the OBS. To be ready to fly the missed approach, you'll accomplish two more tasks: Get the Sacramento VOR tuned in on the number two VOR receiver and set the 157˚ radial on the number two OBS, though you could identify TRACY intersection with just one VOR receiver and DME. So with VOR and DME, you have a grand total of five tasks (six, if you count resetting the OBS to the Manteca 229˚radial on the missed approach).
If you have two VOR receivers and no DME, you'll have five more tasks to accomplish. On the number two VOR, you'll need to tune and identify the Modesto VOR, set the OBS to identify MANCO intersection, and passing MANCO, you'll need to set the OBS to identify the final approach fix. If you have a flip-flop frequency feature, put Sacramento in the backup frequency so you'll be ready for the missed approach. Passing MANCO, make the Sacramento VOR frequency active in the number two receiver and set the 157˚ radial (this requires you to twist the OBS nearly 180˚). And if your aircraft has an ADF and you want to be really thorough, the designers of this approach have even thrown in the Livermore REIGA LOM into the mix, though I'm not sure what this buys you. So if you don't have DME, you'll have at least 11 tasks to accomplish to fly this approach all the way to the missed approach.
What might not be obvious is that this approach starts with a relaxed tempo: The descent profile is very gradual all the way to the missed approach point. But things unfold very quickly when flying the missed approach: You only have to climb to 2000 feet and TRACY intersection (where you hold) is not at all far away. The devil is in the details, as they say.
Flying this approach with GPS involves loading the approach, then (depending on the model of GPS) possibly activating the approach, and setting the course (unless the plane is equipped with an electronic HSI). Throw RAIM prediction and this brings you to a grand total of two to four tasks. Flying the missed approach involves just one or two tasks (depending on the GPS equipment being used). What's not to like?
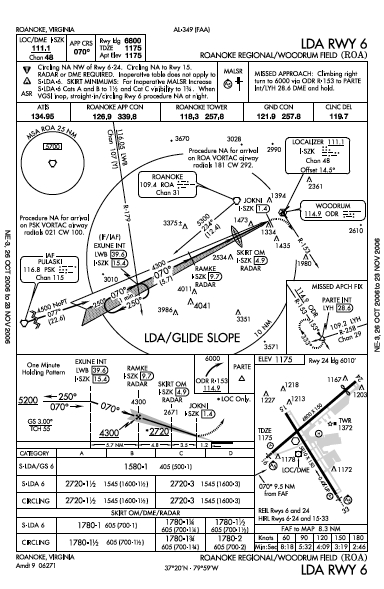
The Tracy approach I've cited is not the worst of 'em in terms of complexity. Consider the Roanoke LDA RWY 6 approach, which is one of the more complex approach charts I recall seeing. Aside from all the restrictions, walk through the missed approach procedure and imagine what sorts of knob twisting and button pushing you'd need to do. And you want to make sure you get it right because there is plenty of cumulus granitus around Roanoke.
As the specifications for developing instrument approaches gradually became more complicated, it was inevitable that some instrument approaches would, themselves, become complicated as well. Pilots usually don't have much say in the matter. We just want a procedure we can safely fly in bad weather.
So how can the average GA pilot go about handling complexity in instrument approaches when flying single-pilot IFR? I'll offer some strategies in the next installment. In the meantime, if you have a favorite procedure that is particularly arcane, please feel free to share it.


